 Domain SearchSecure your perfect UAE domain in seconds.
 All TLDsSecure your ideal domain. Explore local UAE and international extensions.
 WHOIS LOOKUPCheck domain ownership, expiry dates, and registrar details instantly.
 AE DomainRegister a .AE domain and build trust in the UAE.
 .com DomainGet the world’s most trusted domain and build credibility from day one.
 Web hostingFind budget-friendly hosting that doesn’t compromise on performance.
 Windows HostingHigh-performance hosting for Windows applications and websites.
 Affiliate ProgramBecome a partner and earn commission for every referral.
 WordPress HostingBlazing-Fast WordPress Hosting, Optimised for Performance.
 Email HostingSecure your communications with professional email hosting. Use your domain, stay in control.
 Reseller HostingLaunch your own hosting brand. We handle the tech, you grow your business.
 cPanel HostingHosting supported by cPanel (simple and user-friendly)
 VPS HostingVirtual servers that grow with you. Full root access. Blazing fast performance.
 Managed VPS HostingNot a tech expert? Let us handle everything with our fully managed VPS hosting.
 Dedicated ServersEnjoy full access and total control over your dedicated physical server.
Most people believe migrating a WordPress site means hours of downtime and a week of fixing broken pages.
That belief has kept thousands of UAE businesses on slow servers longer than necessary.
The reality is different. A properly planned migration has zero visible downtime, takes one afternoon of active work, and leaves your site faster than it was before.
Here is exactly how that process works, step by step.

What You Need Before Starting the WordPress Migration
Rushing into a migration without a clear inventory is the fastest way to miss something.
Take 30 minutes to map out everything connected to your hosting account.
Start by listing all assets tied to your current server. This list should cover your WordPress files, MySQL database, email accounts, subdomains, third-party API keys, and SSL certificates.
One common problem for UAE businesses: the domain was registered under an agency or developer’s account.
Sort out credentials before you start. Delays at DNS time will cost you.
Here is a complete pre-migration checklist to work through:
- Confirm login access to your domain registrar
- Confirm login access to your current cPanel or Plesk hosting account
- Note the current PHP version (e.g., PHP 8.2) and MySQL version
- Check whether your current server runs Apache, Nginx, or LiteSpeed
- List all active plugins, themes, and any custom code or cron jobs
- Identify third-party integrations: payment gateways, CRM tools, and booking systems
- Record all email accounts associated with your domain
- Download a fresh, full backup before touching anything else
Choosing the Right UAE Hosting Provider
Not every UAE host is equal. The right choice depends on your site size, traffic volume, and technical requirements.
Pay close attention to the server stack your new host uses. If your old server runs Apache and the new one runs LiteSpeed, your .htaccess caching rules may need updating.
LiteSpeed uses its own cache rules, and Apache directives do not always transfer cleanly.
Confirm that the new host supports your exact PHP version. Mismatched PHP versions cause plugin and theme failures that can look identical to a broken migration.
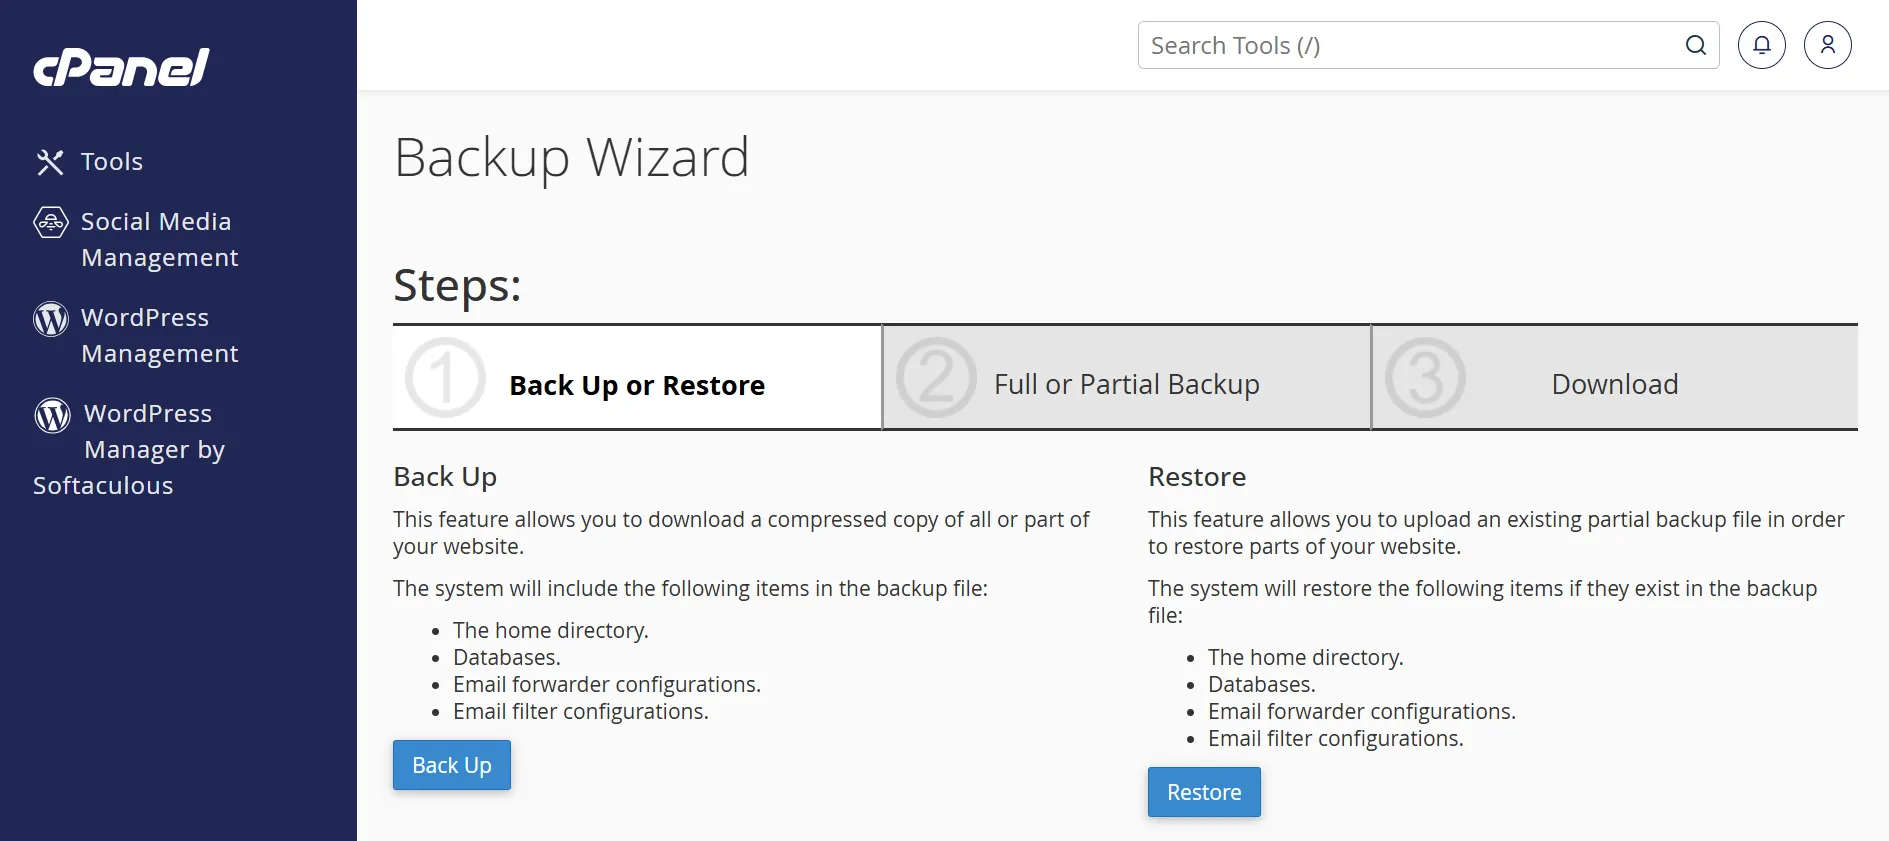
How to Back Up Your WordPress Site Before Migrating
A backup is your safety net. Without one, a failed migration means starting over from a broken state.
Always create a fresh backup on the day of migrating WordPress, not the day before.
Store your backup off-server. Save it to Google Drive, Dropbox, or your local hard drive.
Never rely on the hosting account you are leaving as your only backup location.
There are three reliable methods for backing up WordPress before a server move.
All-in-One WP Migration Plugin
The plugin packages your entire site into a single .wpress file. This file includes your database, media, themes, and plugins.
The plugin also handles serialized data safely during import. its great for sites under 512 MB.
UpdraftPlus (Premium)
UpdraftPlus backs up directly to Google Drive, Dropbox, or Amazon S3. Works well for larger sites.
The premium version supports migrating WordPress to a new server without manual downloads.
Manual Backup via FileZilla + phpMyAdmin
For anyone with the technical skills and experience, handling large website migrations using phpMyAdmin is the best option.
Download all files using FileZilla over FTP. Export the database via phpMyAdmin.
It offers more control, but takes more steps. Best for developers comfortable with command-line tools.
Exporting Your Database via phpMyAdmin
Your database holds everything that makes your WordPress site unique: posts, pages, comments, settings, and user data.
Exporting it correctly is one of the most important steps in the process.
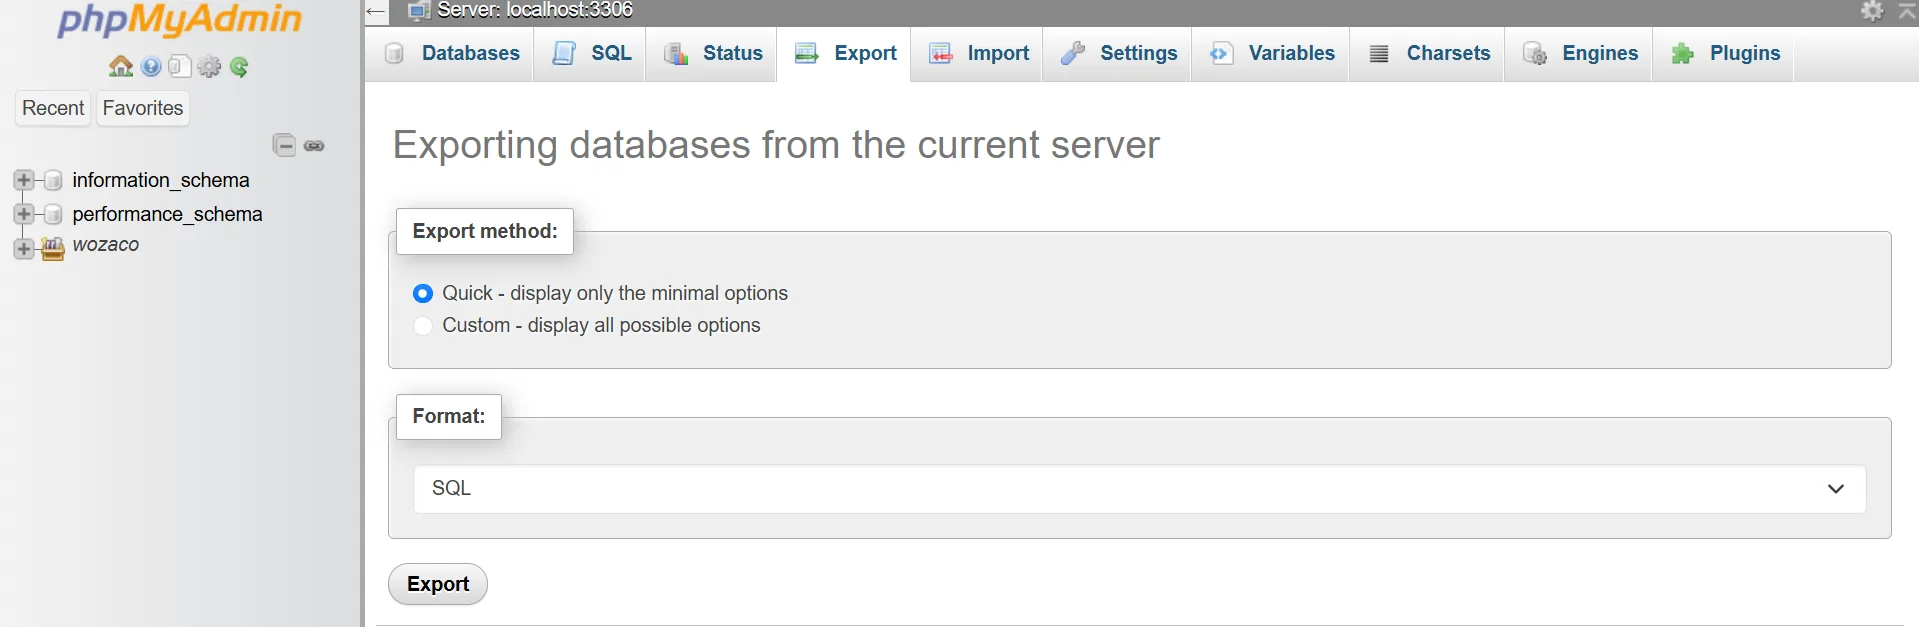
Follow these steps to export your database cleanly:
1) Log in to cPanel on your current host and open phpMyAdmin
2) Select your WordPress database from the left sidebar
3) Click the Export tab at the top of the screen
4) Choose SQL format under the Quick export option
5) Before clicking Go, confirm the character set is UTF-8
6) Click Go and save the .sql file to your computer
One critical feature for UAE sites is Arabic text support. Always confirm UTF-8 encoding before exporting.
This preserves Arabic text and special characters for bilingual sites. Incorrect encoding settings corrupt Arabic content during import.
For large databases over 1 GB, phpMyAdmin often times out mid-export. In that case, use WP-CLI over SSH instead.
It is faster and far more reliable for heavy databases. The command is simply:
wp db export backup.sqlSetting Up the New UAE Server Before Touching DNS
Before uploading a single file, properly prepare the new server. A mismatch between your old and new environments is the number one cause of post-migration errors.
Configuring the Server Environment to Match Your Old Host
Start with PHP version matching. If your old server runs PHP 8.2, the new UAE host must also run PHP 8.2. Even a minor version difference (8.1 vs 8.2) can break certain plugins.
Check MySQL or MariaDB version compatibility as well. Then configure your memory limits, opcache settings, and server-level caching on the new host before importing anything.
Here is a server environment comparison checklist:
- PHP version: must match old server exactly (e.g., 8.2.x)
- MySQL/MariaDB version: check compatibility with your database export
- Web server type: Apache, Nginx, or LiteSpeed (note any .htaccess differences)
- PHP memory limit: set to at least 256 MB, ideally 512 MB for larger sites
- Max upload size: Set php_value upload_max_filesize and post_max_size to match your old host
- SSL certificate: prepare to install a fresh certificate on the new server
Uploading Files to the New Server
Use SFTP rather than plain FTP for file transfers. SFTP encrypts your connection and is required by most modern UAE hosts.
Connect using FileZilla with the SFTP credentials provided by your new host.
Transfer files in this order to save time and avoid confusion:
- wp-content folder first (this is the largest folder and takes the most time)
- wp-includes folder next
- Root-level files last, including wp-config.php, .htaccess, and wp-login.php
Set correct file permissions immediately after upload. Directories need 755 permissions. Files need 644 permissions.
The wp-config.php file specifically should be set to 600 for security.
Do not upload wp-config.php with your old database credentials still inside it.
Update the database name, username, password, and host to match the new UAE server before uploading.
Importing the Database on the New Server
With the files uploaded, the next step is to get your database onto the new server. Create a new database and database user first inside cPanel or Plesk.
Write down the new database name, username, and password carefully. You will need these to update wp-config.php.
Import the .sql file you exported earlier through phpMyAdmin on the new host.
For files larger than 50 MB, use WP-CLI instead:
wp db import backup.sql.After the import, run a search-and-replace on the database. This updates all references from your old domain or server path to the new server’s temporary URL. Use the Better Search Replace plugin or WP-CLI:
wp search-replace 'https://olddomain.com' 'https://tempurl.newhost.com' --all-tablesTesting Your Site on the New UAE Server Before Going Live
Before your WordPress site goes live on the new hosting provider, you should test it out to see if everything is working as it should.
There are two main methods of testing the site: you can use a host staging area if it’s available, or you can use a host file testing method.
The Hosts File Method
The hosts file method lets you see your site on the new server before changing the DNS publicly.
Nobody else sees the new server. Your old site stays live for all other visitors.
Here is how to do it on a Windows machine:
- Open Notepad as Administrator (right-click, Run as Administrator)
- Navigate to C:\Windows\System32\drivers\etc\hosts
- Add a new line at the bottom: [new server IP address] yourdomain.com
- Save the file and open your browser
- Your browser now loads your site from the new UAE server
- Other visitors continue seeing your old host with no disruption
On macOS, open Terminal and run: sudo nano /etc/hosts. Add the same line format. Press Control+O to save and Control+X to exit.
While browsing through the hosts file connection, test everything thoroughly.
Run through this checklist before declaring the new server ready:
- Homepage loads correctly without broken images or missing CSS
- WordPress admin login works at /wp-admin
- All menu items and internal links load without redirect errors
- Arabic/English language switcher works correctly for bilingual UAE sites
- WooCommerce checkout completes a test transaction successfully
- Contact forms submit and deliver emails correctly
- VAT display and currency (AED) show correctly on product pages
- Any booking, appointment, or CRM integrations function as expected
Using the Host Staging or Preview URL
Several UAE hosting providers offer a temporary preview URL for testing. Truehost, for example, provides preconfigured staging URLs for each new server deployment.
Use this staging URL to run performance tests before going live. Open GTmetrix or Google PageSpeed Insights and test your site from the staging URL. Select Dubai as the test location in GTmetrix.
Compare the Core Web Vitals scores between your old host and the new UAE server. You should see a measurable improvement in Largest Contentful Paint (LCP) for GCC-region visitors.
Also check for broken image paths, missing web fonts, plugin conflicts, and any PHP error notices that appear in the site header or footer. Fix all errors before proceeding to DNS.
Switching DNS Without Causing Downtime
1) Lowering DNS TTL: Do This 48 Hours Before the Switch
TTL stands for Time to Live. It tells internet providers how long to cache your DNS records before checking for updates. A high TTL means slow propagation after you switch.
Lower your TTL to 300 seconds (5 minutes) at least 48 hours before your planned DNS switch. This gives existing caches time to expire and refresh quickly after you make the change.
Here is how to lower TTL at your domain registrar:
- Log in to your registrar account
- Go to the DNS management section for your domain
- Find the A record pointing to your current server IP
- Change the TTL value from 3600 (or higher) to 300
- Save the change and wait 48 hours before proceeding
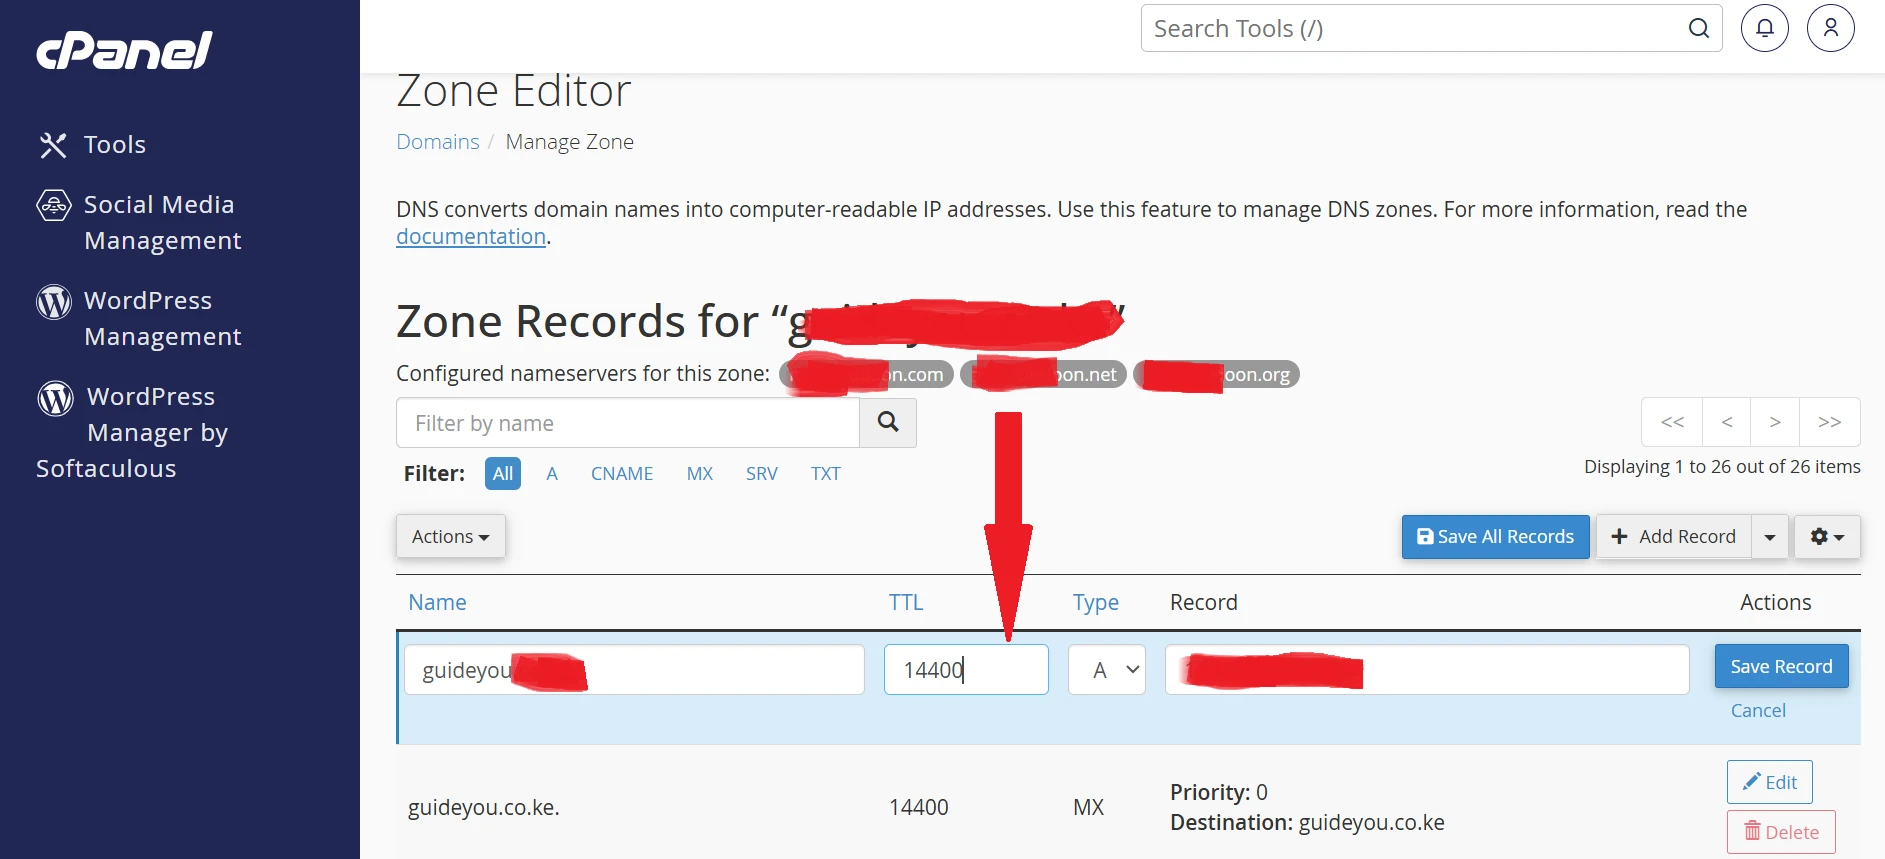
2) Updating Your A Record or Nameservers
When the 48-hour TTL window has passed, and your new server is tested and ready, it is time to switch. You have two options: update the A record or update the nameservers.
Updating the A record is faster and safer for most UAE migrations. You change only the IP address in your DNS while keeping your DNS management at your current registrar.
Propagation typically completes within 2 to 4 hours for Etisalat and du users.
Updating nameservers transfers full DNS control to the new host’s DNS servers.
This takes longer (up to 24 to 48 hours) and makes sense only if you want the new host to manage all DNS going forward.
Regardless of which method you choose, do not shut down your old server. Keep both servers running during the propagation window.
Visitors will hit whichever server their ISP has cached. No one experiences downtime as a result.
3) Verifying Full Propagation Across UAE ISPs
After updating your DNS, verify that propagation is completing correctly. Use dnschecker.org to check your domain’s resolution from UAE-specific nodes.
Also, test from your own machine using a UAE-based VPN. Connect to a Dubai or Abu Dhabi server and visit your domain. Confirm it loads from the new host and not the old one.
Look for these specific confirmation signals before canceling the old host:
- Your domain resolves to the new server’s IP address from the UAE VPN nodes
- HTTPS works correctly with the SSL certificate on the new server
- HTTP requests redirect cleanly to HTTPS without certificate warnings
- WordPress admin login and the full site function normally at your main domain
Post-Migration Steps You Cannot Skip
1) SSL Certificate Setup on the New UAE Server
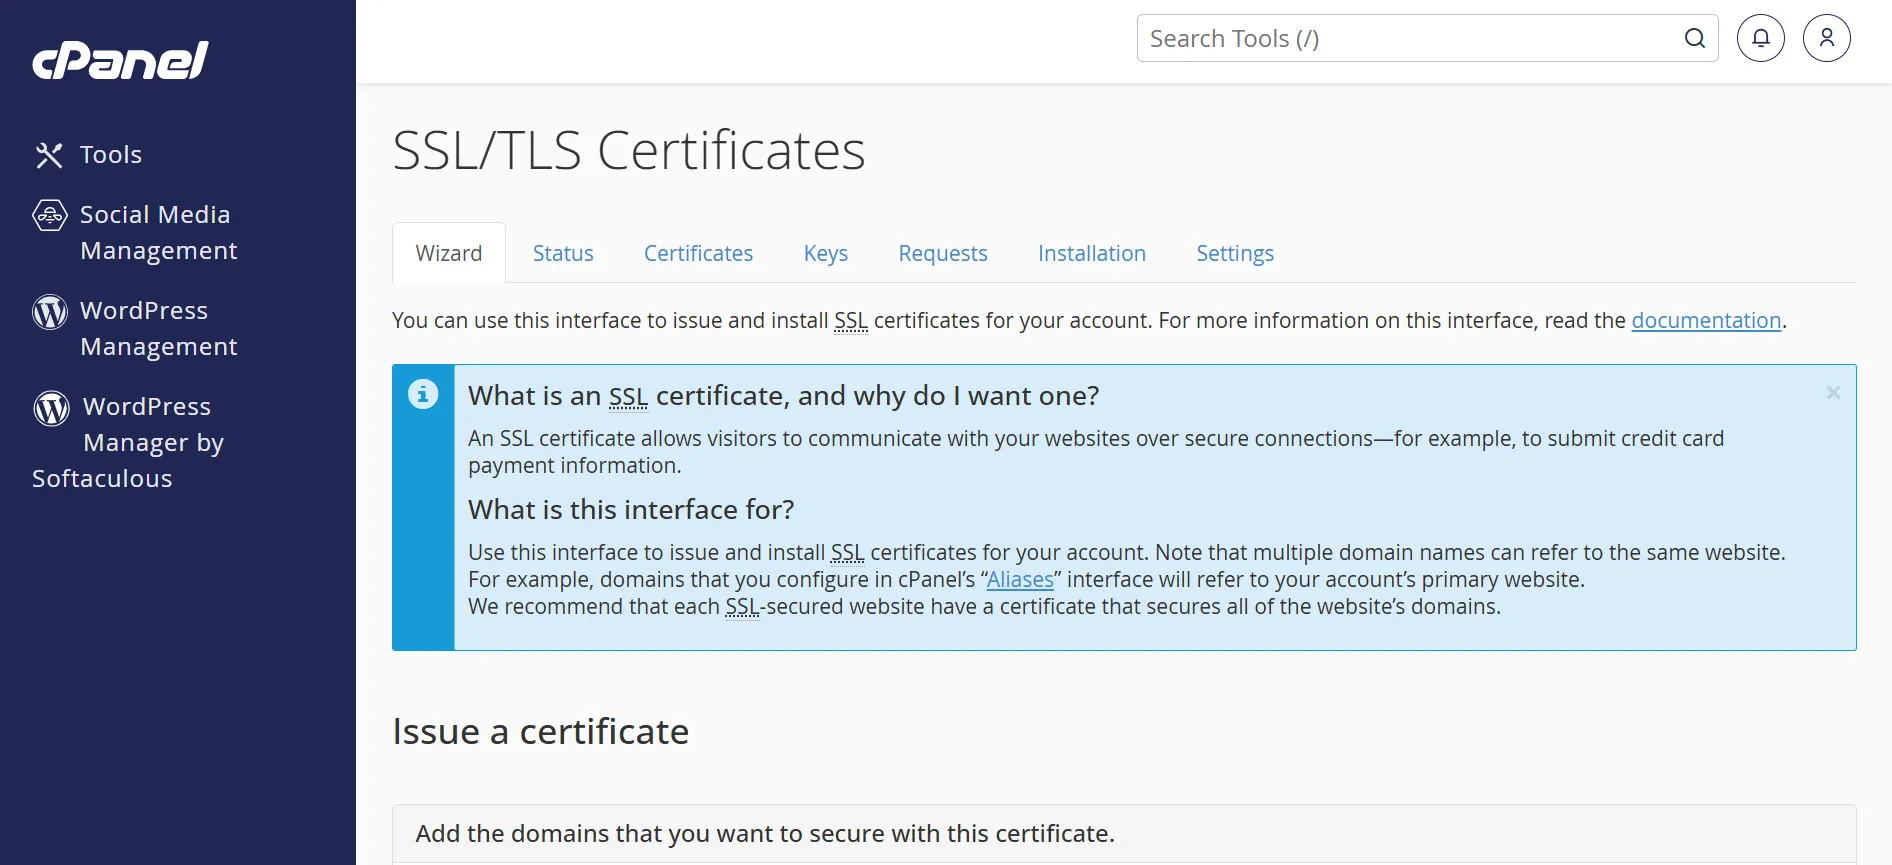
An SSL certificate on the old server does not transfer automatically. You need a fresh certificate installed on the new UAE host.
Most UAE cPanel hosts, including Truehost, offer free Let’s Encrypt certificates with one-click installation from within cPanel.
After installing SSL, update two settings inside your WordPress dashboard. Go to Settings and then General.
Update both the WordPress Address (URL) and Site Address (URL) to use https:// instead of http://.
Also, open wp-config.php and add these two lines if they are not already present:
define('FORCE_SSL_ADMIN', true); define('FORCE_SSL_LOGIN', true);After migrating WordPress, regenerate your WordPress security keys.
Go to the WordPress secret key generator at api.wordpress.org/secret-key/1.1/salt/ and replace all existing keys in wp-config.php with freshly generated ones.
This protects all active sessions on the new server.
2) Caching and Performance Configuration
Clear all caches immediately after DNS propagation completes. Stale cache entries point visitors to old server URLs and cause confusing errors.
If your new UAE host runs LiteSpeed, switch to the LiteSpeed Cache plugin as your primary caching tool.
Remove W3 Total Cache, WP Super Cache, or any other caching plugin you used on the old server.
After clearing the cache, run a speed test from a UAE location. Use WebPageTest at webpagetest.org and select Dubai as your test location.
Compare your Time to First Byte (TTFB) and Largest Contentful Paint (LCP) scores against your old server benchmarks.
Conclusion
Migrating WordPress to a UAE server comes down to four steps done in the right order.
Lower your TTL 48 hours early, run both servers simultaneously, test through the hosts file, and keep the old server live until propagation confirms the switch.
Each step feeds directly into the next, so skipping one creates a gap that shows up later. Done correctly, the entire active process takes one afternoon.
Ready to migrate your Website to a great hosting platform? Truehost offers high-performance hosting plans to choose from.